What you need
- an old pair of jeans or some fabric scrap
- thread
- 2 small wooden buttons
- rubber band (try on the doll and add 1")
- a sewing machine (hand sewing is also possible)
- scissors
- un vieux jean ou des chutes de tissus
- du fil
- 2 petits boutons en bois
- du ruban élastique (essayez sur la poupée et ajoutez 2 cm)
- une machine à coudre (il est aussi possible de le coudre à la main)
- des ciseaux
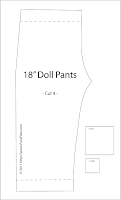
Pattern / Patron
 |
| A3 paper size |
 |
| US Legal paper size |
How to
Print the pattern and pin it to the fabric. Cut out the fabric. Cut two strips of 1" 1/2 x 12" (4 x 30 cm.) You can cut the different parts directly from the jean, no need to rip the seam. This way you will cut both sides of each leg and both strips at the same time.
Put right sides of each leg again each other and sew and serge (or zigzag stitch) both sides of the leg leaving the crotch open.
Turn one leg out and push it inside the other leg so that the crotch seams will meet. Pin and sew and serge (or zigzag stitch). Turn both legs to get the wrong side out.
Serge the bottom of the legs and the waist. Fold, pin and sew the seam of both legs. Then fold and pin the waist band. Sew making sure to leave 1" (2 cm) unstitched. Using a safety pin run the elastic through the casing, make sure you pin the other end of the elastic to the fabric or watch it so it doesn’t go inside of the casing or you will have to start over. Pin the elastic together making sure it isn’t twisted and sew it. Sew the casing shut.
Fold the strips in two lengthwise. Iron. Fold again inwards in two so that it will look like bias tape. Iron and sew together.
Sew to the pants. Sew the buttons on the front and you're done!
Please let me know what you think of this pattern and don't forget to send me you pictures or to share them on PurePixie's Facebook Page. :)
Comment faire
Imprimez le patron et épinglez-le au tissus. Coupez le tissus. Coupez deux bandes de 4 x 30 cm. Vous pouvez directement couper les différentes parties sur le jean, sans ouvrir les coutures au préalable. De cette manière, vous couperez les deux côtés de chaque jambe et les deux bandes en même temps.
Posez les deux faces de chaque jambe endroit du tissus sur endroit du tissus. Cousez et surjetez (ou surfilez le bord avec le point zigzag) les deux côtés des deux jambes en prenant garde à ne pas toucher l'entre-jambe.
Retourner l'une des deux jambes et la glisser dans la première pour que le tissus soit endroit contre endroit. Epinglez, cousez et surjetez (ou surfilez le bord avec le point zigzag. Retournez les deux jambes sur l'envers.
Surjetez (ou surfilez le bord avec le point zigzag) le bas des jambes et la ceinture. Pliez et épinglez le bas des jambes. Pliez et épinglez la ceinture. Cousez en prenant soin de vous arrêter 2cm avant de boucler le cercle. Glissez l'élastique dans la gouttière avec l'aide d'une épingle nourrice (faites attention à bien attacher l'autre extrémité pour qu'elle ne disparaisse pas à l'intérieur). Épinglez l'élastique pour fermer l'anneau en vous assurant qu'il n'est pas vrillé. Cousez. Fermez la couture de la gouttière.
Pliez les deux bandes de tissus dans le sens de la longueur, repassez. Pliez les deux bords à nouveau en deux pour que vos bandes ressemblent à du biais. Repassez et cousez. Cousez les à la ceinture du pantalon. Cousez les boutons sur le devant. Et voilà votre pantalon est fini !
N'oubliez pas de me dire ce que vous pensez de ce tutoriel et pensez à m'envoyer vos photos ou bien partagez-les sur la Page Facebook de PurePixie. :)


5 comments:
This is adorable!
Thank you! :)
Tellement mignon! On peut avoir une photo avec la poupée?
Merci ! Tu as raison. Il va falloir que je prenne une photo de la poupée debout.
Thank you! I can't wait to make them.
Post a Comment