Showing posts with label DIY. Show all posts

Tuesday, November 12, 2013

Fall crafts with chestnuts
Bricolage d'automne avec des chataignes

What do you do on a (very) rainy weekend with active kids?
Since we had gathered the last chestnuts from our garden on Saturday, we decided that owed to enjoy a little play with them.
Que faites-vous de vos enfants lorsqu'il pleut le weekend ?
Comme nous avions ramassé les dernières châtaignes ce samedi (il y en avait des kilos !), nous avons decidé de bricoler un peu

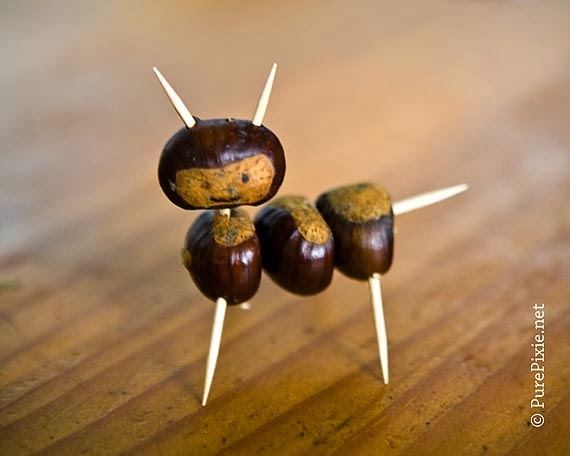
With the help of a few toothpicks, here is what we came up with:
Avec l'aide de quelques cure-dents, voici ce que nous avons fait :


Chestnut animal
Animal de châtaigne
Chestnut little man
Bonhomme de châtaigne
We also made a chestnut sun with some cotton yarn
Nous avons aussi fait des soleils (à défaut de le voir) avec du fil de coton

Make little holes and add toothpicks
Faites des petits trous et enfoncez les cure-dents
Add some cotton thread all around the chestnut
and enjoy your handmade sun
Ajoutez de la laine autour de la chataigne
And soon the kids started some free play. Perfect, isn't it? :)
Et tres vite, les enfants se sont mis a s'inventer des histoire. Le bonheur, quoi ! :)


We ended up the day with delicious grilled chestnuts and yoghurt.
Nous avons fini la journée avec de délicieuses châtaignes grillées et du yaourt.

Grilled chestnuts
Châtaignes grillées
And what about you? What do you do to keep good spirits in your home when it is pouring outside?
Et vous que faites-vous pour garder tout le monde joyeux dans votre maison lorsqu'il pleut dehors ?

Monday, October 28, 2013

Homemade Apple Butter
Recette du Beurre de Pommes

Since we moved to France we've been missing our favorite Apple butter from the Berkeley Farmers' market. Since we couldn't find anything similar here, we've decided to make our own.

Depuis que nous sommes revenus en France, le beurre de pommes que nous trouvions sur le marché de Berkeley en Californie nous manquait énormément. Comme nous ne trouvions pas d’équivalent nous avons décidé de faire le notre.


So here is our recipe / Voici notre recette

  • as many apples as you can fit in your slow cooker
  • organic unraffined whole sugar (I used rapadura) if needed
  • an apple peeler (optional)
  • a crockpot
  • a clean jar handler
  • clean jars with lids
  • autant de pommes que nécessaire pour remplir votre mijoteuse
  • du sucre rapadura bio (en magasin bio) si nécessaire
  • un éplucheur de pommes (optionnel)
  • une mijoteuse
  • une pince à pot propre
  • des pots à confiture propres avec leur couvercle 
I found it is easier to start this recipe in the evening so that it will cook all night, but this is really up to you
Peel the apples and remove the seeds. Here I used an apple peeler, but this can also be done with a knife.

Je trouve qu'il est plus simple de commencer cette recette le soir et de laisser cuire les pommes toute la nuit, mais c'est à vous de juger. 
Pelez et épépinez les pomme. Ici j'ai utilisé un éplucheur de pommes, mais un couteau fera aussi l'affaire.


Cut the apples in small pieces. Add to your slow-cooker. 

Couper les pommes en petits morceaux. Mettez les dans la mijoteuse.


Cover and cook on low setting for 12 hours. Then remove the lid, stir in and cook for another 12 hours or until you get the right consistency. Stir every 2 hours if you can. Towards the end taste and add sugar if necessary. If your apples were sweet you may leave them as is.

Spoon the butter into clean jars using a clean jar handler. Close the lids. Add a little bit of water in a pan that is large enough to contain all the jars. Bring the oven to 225F (or 100C). Add the jars to the pan and leave them in the oven for an hour. Stop the oven and let them cool down. 
You're done! Bon appetit !

Couvrir et laisser mijoter pendant 12 heures. Retirer le couvercle et laisser mijoter 12 autres heures ou jusqu’à ce que vous obteniez la consistance désirée. Remuer toutes les deux heures si vous le pouvez. Quand la cuisson est presque terminée, vérifiez le gout et ajouter du sucre si nécessaire  Si vos pommes sont très sucrées il se peut que vous puissiez les laisser telles quelles.

Versez le beurre dans les pots à l'aide d'une pince à pot pour ne pas vous brûler. Fermez les couvercles. Versez un peu d'eau dans le fond de la lèche frite de votre four. Amenez votre four a 100C (225F). Ajoutez les pots dans la lèche-frite et laisser pendant une heure. Arrêtez le four et laissez refroidir. 
Et voilà ! Bon appétit ! 


Wednesday, October 23, 2013

Green Tomato Jam Recipe
Confiture de Tomates Vertes

I took care of the green tomatoes we gathered yesterday and made green tomato jam. We tasted it this morning at breakfast. It was delicious!

Je me suis occupée des tomates vertes ramassées hier nous avons fait de la confiture de tomates vertes. Nous l'avons testée ce matin au petit déjeuner, elle était délicieuse.


So here is the recipe / Voici la recette

  • 2 lbs 3oz (1kg) green tomatoes (if you don't have enough green tomatoes, you can add ripe tomatoes)
  • 10 oz (300g) organic unraffined whole sugar (I used rapadura)
  • 1 organic lemon
  • 1 stick cinamon (optional)
  • a knife 
  • a sauce pan
  • a clean jar handler
  • clean jars with lids
  • 1kg (2 lbs 3oz) de tomates vertes (si vous n'en avez pas suffisamment vous pouvez ajouter des tomates mures)
  • 300g (10oz) de sucre rapadura (en magasin bio)
  • 1 citron bio
  • 1 bâton de cannelle (optionnel)
  • un couteau 
  • une casserole
  • une pince à pots
  • des pots à confiture propres avec leur couvercle

Clean the tomatoes and the lemon.Cut both the tomatoes and the lemon with skin into dice.
Mix with the sugar and let stand for 3 hours to draw juices. Pour all the ingredients in a saucepan and cook over low heat until the tomatoes are really soft and the juices are thickened (about 3/4 hour.) Remove the cinnamon stick (if needed).

Spoon the tomato jam into clean jars using a clean jar handler. Close the lids. Add a little bit of water in a pan that is large enough to contain all the jars. Bring the oven to 225F (or 100C). Add the jars to the pan and leave them in the oven for an hour. Stop the oven and let them cool down. 
You're done! Bon appetit !

Do you have another recipe? Use different spices? I would love to hear about it. :)

Nettoyez soigneusement les tomates vertes et le citron. Coupez les tomates vertes et le citron av ec sa peau en petits dés.
Ajoutez le sucre et laissez reposer 3 heures pour laisser le jus sortir. Versez tous les ingrédients dans une grande casserole et laisser mijoter jusqu’à ce que les tomates soient molles et que la confiture ait épaissi (environ 3/4 heure). Retirez le bâton de cannelle (si nécessaire).

Versez la confiture de tomates dans les pots à l'aide d'une pince a pots pour ne pas vous brûler. Fermez les couvercles. Versez un peu d'eau dans le fond de la lèche frite de votre four. Amenez votre four a 100C (225F). Ajoutez les pots dans la lèche-frite et laisser pendant une heure. Arrêtez le four et laissez refroidir. 
Et voilà ! Bon appétit ! 

Avez-vous une autre recette de tomates vertes ? Vous utilisez d'autres épices ? J'aimerais tellement 
N'oubliez pas de laisser un commentaire. Merci !

Thursday, March 22, 2012

DIY: Rainbow Spring tshirt!
Tuto: T-shirt de printemps arc-en-ciel !

To celebrate the Spring we made a rainbow flower t-shirt.
Pour célébrer le printemps, nous avons décider de peindre un t-shirt aux couleurs de l'arc-en-ciel.

What you need / De quoi avez-vous besoin

  • an (organic, of course! ;)) blank t-shirt /un t-shirt (bio, bien sûr ! ;)) sans décoration
  • some freezer paper / du papier de boucher
  • an inkjet printer / une imprimante jet d'encre
  • an X-acto knife / un cutter
  • waterbased fabric paint in different colors (we use Permaset paints) / de la peinture acrilique pour tissus 
  • a small container filled with water to clean the paintbushes / un verre d'eau pour nettoyer les pinceaux
  • a paint brush / un pinceau
  • an iron (to heat-set the paint) / un fer à repasser
Pattern / Patron


How to / Comment faire

Cut a sheet of freezer paper the size of a regular Letter size paper. Print the pattern on the non-shiny side.
Trace the flower borders carefully with an X-acto knife and remove the petals and the heart of the flower.
Coupez la taille d'une feuille A4 and le papier de boucher. Imprimer le modèle sur la partie non-brillante. 
Suivre les traits au cutter afin d'évider la fleur.

Set the iron on low temperature and iron the shiny side of the paper on the t-shirt. If you misplace it you can always peel it off and iron again.
Place another sheet of freezer paper under the pattern to make sure that the paint won't stain the back of the t-shirt.
Faire chauffer le fer à repasser à température douce et repasser la partie brillante contre le t-shirt pour la faire adhérer. Si vous vous trompez, décollez le papier et recoller le papier.
Placez une autre feuille de papier de boucher de l'autre côté du motif (à l'intérieur du t-shirt) afin de protéger le dos.


Paint carefully the flower with your kids. 
Peignez la fleur avec vos enfants.


When you are done peel off the paper. You can touch up the paint if you are not completely satisfied.
And voilà!
Lorque vous avez fini, décollez le papier. Vous pouvez faire des retouches si nécessaire. 
Et voilà !


Let it dry overnight of use a hairdryer if you can't wait.
Laisser sécher une nuit ou utiliser le sèche-cheveux si vous ne pouvez pas attendre. 
 

On the following day, set the paint with an iron. I usually iron the design for 2mn with the iron set on wool. Make sure to cover all areas and best of all do not burn the fabric.
Le lendemain, fixez la peinture avec un fer à repasser. En général je repasse une zone pendant 2mn à une température laine. Faites bien attention à fixer toutes les zones et à ne pas brûler votre tissus.

Enjoy! Don't forget to send me your pictures!
Have you done something special to celebrate the Spring?
Bonne chance et n'oubliez pas de m'envoyer vos photos !
Avez-vous fait quelque chose de particulier pour célébrer le printemps ?

Thursday, April 21, 2011

DIY: Mama pads
Tuto: Serviette lavables et réutilisables


What you need
Snaps (preferably made of resin so they won't rust)
For this pad I used 5 layers of fabric, but you can use more or less depending on the ratio absorbancy/bulkyness you wish.
You will need one soft layer for the outside (natural fiber flannel, velours, etc.), one or more layers of fast absorbant fabric (natural fiber terry, etc.), one or more layers of fabric that will store fluids (natural fiber fleece, etc.), and one layer of fabric that will protect your clothes (felted wool is my favorite because it is eco-friendly and breathable, but you can use PUL or polar fleece as well.)
Make sure to prewash and dry all your fabrics to make sure that no shrinkage will happen.

De quoi avez vous besoin
4 boutons pression (en resine pour qu'ils ne rouillent pas)
Pour cette serviette (pad), j'ai utilise 5 couches de tissus, mais vous pouvez en mettre plus ou moins si vous souhaiter une serviette plus ou moins absorbante et plus ou moins discrète. Vous aurez besoin d'une couche douce pour l’extérieur (flanelle, velours, etc.), une ou plusieurs couches d'absorbantes (éponge, etc.), une ou plusieurs couches de stockage de l’humidité (molleton, etc.), et une couche isolante pour protéger vos vêtements (la laine bouillie a ma préférence parce qu'elle est écologique et respirante, mais vous pouvez aussi utiliser du PUL ou de la polaire).
Pensez à prélaver et sécher tous vos tissus avant de les couper afin de prévenir tout rétrécissement.

Pattern / Patron
Letter paper size

A4 paper size


How to / Comment faire
Cut out the fabric layers for the pad. Make sure that they are all cut in the length of the fabric. Pin them together making sure that all edges meet. Zigzag or serge all layers together.
Cut out 2 layers of fabric for the strap (one soft layer like the pad's top one and another one like the pad's bottom one.) Pin together both layers right side against right side. Sew 1/4" from the border, leaving 1" open. Cut out the corners and turn right side up. Close the open area and top sticht.

Coupez les différentes couches de tissus de la serviette. Faites attention déjà toutes les couper dans le sens de la longueur du tissus (i.e. dans le droit fil si vous utilisez des tissus tissés). Épinglez les ensemble en prenant bien soin de bien aligner tous les bords. Cousez avec le point zigzag ou surfilez.
Coupez les deux couches de tissus de la sangle (strap) : une couche douce comme la couche extérieure de la serviette et une couche isolante comme la couche inférieure de la serviette. Épinglez ces deux couches ensemble endroit contre endroit. Cousez à 5mm du bord en prenant soin de laisser 2 à 3 cm ouverts. Retournez. Fermez l'ouverture et surpiquez les 4 côtés.

Strap and pad before they are sewn together
La sangle et la serviette avant qu'ils soient cousus ensemble

Sew the strap on the edge of the pad. Add the snaps.

Cousez la sangle aux deux bords extérieurs de la serviette. Ajoutez les pressions. 


Back side / Côté arrière

You're done! Your cloth menstrual pad is ready to use!
Et voilà, c'est fini ! Votre serviette hygiénique est prête à l'emploi!

Thursday, March 24, 2011

DIY: 18" doll sweater
Tuto : pull pour poupée en tissus de 46 cm


What you need
  • one sleeve from a large felted wool sweater (felting will prevent unraveling)
  • thread
  • a little piece of Velcro
  • a sewing machine (hand sewing is also possible)
  • scissors
 De quoi avez-vous besoin
  • une manche d'un grand pull en laine feutrée (ca permet qu'il ne se détricote pas)
  • du fil
  • un petit morceau de Velcro
  • une machine à coudre (il est aussi possible de coudre à la main)
  • des ciseaux
Pattern/Patron
US Letter paper size

A4 paper size

How to /Instructions
Measure 20 cm from the end of the sleeve and cut.

Mesurez 20cm depuis le bas de la manche et coupez.


Place the seam in the center of the back.
Measure 9 cm  on each side and cut (armholes).

Placez la couture de la manche au milieu du dos.
Mesurez 9 cm depuis le haut du tissus de chaque côté et coupez (emmanchures) 


Turn the "sleeve" to have the wrong side out.
Open the seam in the back from the top for 5 cm. Sew were you stop to make sure that it won't continue to open afterwards.
Pin the neck line front and back (2 cm down) and sew.
Pin the shoulders (5 cm) and sew.

Retourner le bout de manche sur l'envers.
Décousez la couture arrière sur 5 cm depuis le haut.  Cousez un point d'arrêt là pour stopper la couture.
Epinglez l'encollure sur le devant et l'arrière (2 cm vers le bas) et cousez.
Epinglez les épaules (5 cm de chaque côté) et cousez.


In the left over of the sleeve, cut 2 rectangle 13 cm wide by 14 cm long. 
Pin the seam of the sleeves and sew. Pin both long sices together to make the sleeve and sew.

Turn both of them to get the right side out.
Push each sleeve in the armhole. Pin (right side against right side) and sew.

Dans ce qui vous reste de la manche, coupez 2 rectangles de 13 cm par 14 cm.
Epinglez l'ourlet des manches sur un des côtés courts (13 cm). Cousez. 
Epinglez les deux longs côtés ensemble et cousez.
Retournez les deux manches sur l'endroit.
Glissez chacune des manches dans l'emmanchure. Epinglez (endroit contre endroit) et cousez.


Sew a small piece of velcro to close the opening in the back. Make sure to place the scratchy part facing you (and not the doll) so that it won't damage its skin.
Turn the sweater on the right side and you're done!

Cousez le Velcro sur l'ouverture dans le dos. Faites attention à placer le côté qui accroche face vers vous (et pas contre la poupée) pour qu'il n'abime pas sa peau.
Retournez le pull sur l'endroit. Il est prêt !


Please let me know what you think of this pattern and don't forget to send me you pictures or to share them on PurePixie's Facebook Page. :)

N'oubliez pas de me dire ce que vous pensez de ce tutoriel et pensez à m'envoyer vos photos ou bien partagez-les sur la Page Facebook de PurePixie. :)

Wednesday, March 23, 2011

DIY: 18" doll pants with suspenders
Tuto : pantalon à bretelles pour poupée en tissus de 46 cm


What you need
  • an old pair of jeans or some fabric scrap
  • thread
  • 2 small wooden buttons
  • rubber band (try on the doll and add 1")
  • a sewing machine (hand sewing is also possible)
  • scissors
De quoi avez-vous besoin
  • un vieux jean ou des chutes de tissus
  • du fil
  • 2 petits boutons en bois
  • du ruban élastique (essayez sur la poupée et ajoutez 2 cm)
  • une machine à coudre (il est aussi possible de le coudre à la main)
  • des ciseaux

    Pattern / Patron

    A3 paper size

    US Legal paper size

    How to
    Print the pattern and pin it to the fabric. Cut out the fabric. Cut two strips of 1" 1/2 x 12" (4 x 30 cm.) You can cut the different parts directly from the jean, no need to rip the seam. This way you will cut both sides of each leg and both strips at the same time.

    Put right sides of each leg again each other and sew and serge (or zigzag stitch) both sides of the leg leaving the crotch open.
    Turn one leg out and push it inside the other leg so that the crotch seams will meet. Pin and sew and serge (or zigzag stitch). Turn both legs to get the wrong side out.
    Serge the bottom of the legs and the waist. Fold, pin and sew the seam of both legs. Then fold and pin the waist band. Sew making sure to leave 1" (2 cm) unstitched. Using a safety pin run the elastic through the casing, make sure you pin the other end of the elastic to the fabric or watch it so it doesn’t go inside of the casing or you will have to start over. Pin the elastic together making sure it isn’t twisted and sew it. Sew the casing shut.
    Fold the strips in two lengthwise. Iron. Fold again inwards in two so that it will look like bias tape. Iron and sew together.
    Sew to the pants. Sew the buttons on the front and you're done!

    Please let me know what you think of this pattern and don't forget to send me you pictures or to share them on PurePixie's Facebook Page. :)

    Comment faire
    Imprimez le patron et épinglez-le au tissus. Coupez le tissus. Coupez deux bandes de 4 x 30 cm. Vous pouvez directement couper les différentes parties sur le jean, sans ouvrir les coutures au préalable. De cette manière, vous couperez les deux côtés de chaque jambe et les deux bandes en même temps.
    Posez les deux faces de chaque jambe endroit du tissus sur endroit du tissus. Cousez et surjetez (ou surfilez le bord avec le point zigzag) les deux côtés des deux jambes en prenant garde à ne pas toucher l'entre-jambe. 
    Retourner l'une des deux jambes et la glisser dans la première pour que le tissus soit endroit contre endroit. Epinglez, cousez et surjetez (ou surfilez le bord avec le point zigzag. Retournez les deux jambes sur l'envers. 
    Surjetez (ou surfilez le bord avec le point zigzag) le bas des jambes et la ceinture. Pliez et épinglez le bas des jambes.  Pliez et épinglez la ceinture. Cousez en prenant soin de vous arrêter 2cm avant de boucler le cercle. Glissez l'élastique dans la gouttière avec l'aide d'une épingle nourrice (faites attention à bien attacher l'autre extrémité pour qu'elle ne disparaisse pas à l'intérieur). Épinglez l'élastique pour fermer l'anneau en vous assurant qu'il n'est pas vrillé. Cousez. Fermez la couture de la gouttière.
    Pliez les deux bandes de tissus dans le sens de la longueur, repassez. Pliez les deux bords à nouveau en deux pour que vos bandes ressemblent à du biais. Repassez et cousez. Cousez les à la ceinture du pantalon. Cousez les boutons sur le devant. Et voilà votre pantalon est fini !


    N'oubliez pas de me dire ce que vous pensez de ce tutoriel et pensez à m'envoyer vos photos ou bien partagez-les sur la Page Facebook de PurePixie. :)

    Wednesday, March 16, 2011

    Homemade playdough
    Pâte à modeler maison

    My kids love to play with playdough (play-doh). We had for a while some safe one made out of bee's wax that we got from France. But since I've looked around and couldn't find anything I could trust. So I've decided to make our own.
    My kids had so much fun participating that I'm sure that we will make some more once this one is gone.

    Mes enfants adorent jouer avec la pâte à modeler. Jusqu'à il y a peu, nous en avions une qui me semblait fiable. Elle venait de France et était faite à partir de cire d'abeille. Depuis j'ai regardé ce qui se faisait ici aux Etats-Unis et je n'ai rien pu trouver qui me plaise. J'ai donc décidé d'en faire.
    Mes enfants se sont tellement amusés à aider à la préparer que je suis sûre que nous recommencerons.  

    ----
    So here is the recipe we followed:
    • 2 cups flour
    • 2 cups warm water
    • 1 cup salt (fine and not coarse as shown on the picture)
    • 2 tablespoons vegetable oil
    Optional
    • 1 tablespoon cream of tartar (it improves elasticity)
    • food coloring (please read bottom note if you are unsure)


      Voici donc la recette :
      • 2 tasses de farine blanche
      • 2 tasses d'eau chaude
      • 1 tasse de sel fin (pas de gros sel comme montré sur la photo)
      • 2 cuillères à soupe d'huile de table
      Optionel
      • 1 cuillère à soupe de crème de tartre (pour plus d'élasticité)
      • colorants alimentaires (lisez la note de bas de page, si vous hésitez)


      Mix all of the ingredients together (except the food coloring).
      Stir over low heat so that the dough thickens. When it pulls away from the sides, remove the pan from heat and let cool down until you can hold it.

      Méler tous les ingrédients (sauf les colorants)
      Cuire à feu doux pour que la pâte épaississe. Mélanger jusqu'à ce quel les bords se détachent (un peu comme de la pâte à choux). Retirer du feu et laissez refroidir jusqu'à ce que vous puissiez prendre la pâte dans vos mains sans vous brûler.


      Remove the dough from the pan and knead it vigorously until it becomes elastic and very smooth.

      Retirez la pâte de la casserole et  pétrir jusqu'à ce qu'elle devienne élastique et très lisse.


      If you want to add colors, divide the dough into balls for coloring. And dig hole with your finger in the center of each ball.
      If you haven't already, put some rubber gloves on to protect your hands. You can also use a plastic bag. Protect also your counter

      Si vous voulez ajouter des colorants, diviser votre pâte en autant de boules et faite un trou au centre de chacune.
      Enfilez des gants de caoutchouc pour protéger vos mains. Vous pouvez aussi utiliser un sac en plastic. Protégez aussi votre plan de travail.


      Each color reacts differently so just put a few drops of food coloring in each hole. Fold the dough over and knead until it looks homogeneous. Add more color if needed.

      Chaque colorant réagit de manière différente; Ne mettez que quelques gouttes dans chaque boule pour commencer. Repliez la pâte sur le trou et pétrir jusqu'à ce que ce soit homogène. Rajouter du colorant si nécessaire.

      Here is what we got:

      Voici ce que ça donne :


      And what the kids made with it:

      Et ce que les enfants en ont fait :

      A snail - un escargot

      A frog on a pool - une grenouille sur sa mare

      Cute isn't it?
      You can keep the dough for months in a container in your fridge.

      Sympa non ?
      Vous pouvez garder la pâte pendant des mois dans un récipient dans le frigo.

      ----

      Important note:
      While I would never use food colors in food, here I decided to use colors that I inherited a long time ago. I thought it would be fun for the kids. Honestly, next time we won't. First you'll see that they will get mixed very easily and you will soon end up with all brownish playdough. But more important, since I read not so fun stuff about food coloring here and here which make it even less appealing. There is so much to learn!

      Note importante :
      Je n'utilise jamais de colorants alimentaire dans de la nourriture, mais pour cet usage j'ai décidé que c'était OK et que c'était plus amusant. Honnêtement, je ne pense pas que je recommencerais. D'une part, les couleurs se mélangent très facilement et très rapidement on se retrouve avec un pâte d'un marron incertain. Mais plus important, depuis j'ai lui des choses pas très droles sur les colorants alimentaires ici (en français), ici et ici (en anglais), qui les rendent encore moins attirantes. On en apprend tous les jours!

      Saturday, May 15, 2010

      DIY: Stokke-tripp-trapp chair cushion
      Tuto : Un cousin pour chaise Stokke-tripp-trapp

      We love Stokke Tripp Trapp chairs. We love them so much that we have two of them. One for each kid. If you haven't seen them, this is a wooden chair designed in the 70’s. It looks really good, doesn't take so much space as the plastic one, is easy to clean, comes in all sorts of colors and best of all they aren't made out of plastic. They are quite pricy but since they are so well made, you can find them fairly easily second hand... or may be even third or fouth, who knows? :)

      Until recently it didn't bother us not to have any cushion since it was easier to clean that way. But we just started to be really serious about potty training our little one and I finally felt like making something warm and soft for him to sit on.

      So here is how to make a cushion that will work with any generation of Tripp Trapp chair.


      ::What you need::
      - a Tripp-Trapp chair (to make the pattern)
      - a piece of (organic) cotton for the outside
      - some batting for the padding (needlepunched rather than bonded, so as to avoid glues and resins)
      - matching thread
      - scissors
      - a paper bag
      - a sewing machine

      ::How to proceed::
      1. Unscrew the seat so as to release it

      2. Open a paper bag or take a piece of paper that is large enough.
      Display the seat on the paper and trace around it with a pen.


      Trace another line 2 cm (3/4") around the first line (seem allowance.)


      Cut your pattern

      3. Repeat 2. so as to get another paper pattern.
      Draw two lines along the long side at 7 cm (2" 3/4) from the top and 7 cm (2" 3/4) cm from the bottom.
      Cut out the second pattern and keep both external strips.


      4. Lay the three pieces of the pattern down on the fabric. Cut the fabric. Cut the larger piece of pattern twice.

      5. Lay the larger piece of the pattern on some needlepunched batting and cut four times the pattern to get four pieces.

      6. Hem both smaller pieces on the inside.


      7. Take 2 (out of the 4) pieces of batting, put them on top of each other, at the back piece of the cushion right side on top, and then both stripes you just hemed. Serge or zigzag on 3 sides (leave the curved side untouched).


      8. Take the remaining 2 pieces of batting, add the top part fabric right side on top. Serge or zigzag all around.

      9. Take the top part right side facing up, add the back piece right side against the top part's right side. Pin both pieces together and sew on three sides 1 cm from the border (still miss the curved side).


      10. Cut each angle, 2 mm before the stitched line. Turn inside out but leave stripe on the curved side the wrong side facing up.


      Sew and serge (or zigzag) the curved side of the cushion. Turn the stripe inside out.

      11. Find the center of the cushion and mark it with a pin. Measure the clasp of the chair (width + thickness... mine is 6 cm). Measure also how far it is situated from the border of the seat (mine is 4 cm). Draw the button hole.


      12. Sew the button hole. My sewing machine didn't know how to make one that big all by itself, so I had to figure out the width of the satin stitch for both ends and the sides, and make sure that both lines were parallele, but it wasn't that difficult after all.


      13. Cut the center line of the button hole using a seam riper making sure that you don't cut any of the thread.


      And voilà! Your cushion is ready!!!
      Don't forget to screw everything back on and make sure your chair is secure! :)

      This is my first tutorial in English, what do you think?
      Don't hesitate to ask if some parts seem unclear to you and I'll try to improve it. :)
      Related Posts Plugin for WordPress, Blogger...